반응형
250x250
Notice
Recent Posts
Recent Comments
Link
| 일 | 월 | 화 | 수 | 목 | 금 | 토 |
|---|---|---|---|---|---|---|
| 1 | 2 | 3 | 4 | 5 | 6 | 7 |
| 8 | 9 | 10 | 11 | 12 | 13 | 14 |
| 15 | 16 | 17 | 18 | 19 | 20 | 21 |
| 22 | 23 | 24 | 25 | 26 | 27 | 28 |
Tags
- AWS CI/CD 구축하기
- aws cicd
- Jenkins
- COALESCE
- node
- SQL
- Spring Error
- codebuild
- JavaScript
- kubeflow
- Airflow
- bootstrap
- openlens
- codedeploy error
- docker
- redis
- chart.js
- aws
- 도커
- VPN
- codedeploy
- IntelliJ
- Flux
- chartjs
- java bigdecimal
- Python
- codepipeline
- Spring
- Kafka
- PostgreSQL
Archives
- Today
- Total
Small Asteroid Blog
파이썬으로 워드 클라우드 만들기 (카카오톡 대화내용) 본문
728x90
워드 클라우드를 만드는데
카카오톡 대화내용으로 하고싶어서 만들어 보았다.
카카오톡 내용은
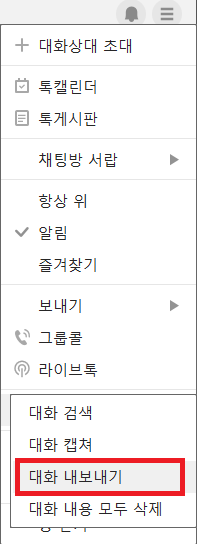
카카오톡 대화창 -> 햄버거메뉴 -> 대화내용 -> 대화내용내보내기

기본적인 환경은 설치 해줘야 한다.
pip install wordcloud
pip install matplotlib
pip install pandas
pip install konlpy
from wordcloud import WordCloud
import matplotlib.pyplot as plt
import pandas as pd
from konlpy.tag import Twitter
from collections import Counter
%matplotlib inline

txt_path = '' #사용하고자하는 카카오톡 txt 파일 위치
file = open(txt_path,'r',encoding='utf-8')#,encoding='utf-8'
lists = file.readlines()
file.close()
#print(lists)

twitter = Twitter()
morphs=[]
for sentence in lists:
    morphs.append(twitter.pos(sentence))
#print(morphs)

#오전,오후,이모티콘,사진 단어 제외하기
naa_list=[]
for sentence in morphs:
    for word, tag in sentence:
        if tag in['Noun','Adjective'] and('오전' not in word) and('오후' not in word) and('이모티콘' not in word) \
        and('사진' not in word):
            naa_list.append(word)
#print(naa_list)

count = Counter(naa_list)
words = dict(count.most_common()) #전체 단어 빈도수
tags = count.most_common(100) #단어 100개까지


#워드클라우드 만들기
#폰트 파일 위치
fonts_path='C:\\Users\\user\\Downloads\\Nanum\\NanumGothic.ttf'
wordcloud = WordCloud(font_path=fonts_path, background_color='white',width=1000,height=1000)

cloud = wordcloud.generate_from_frequencies(words) #전체단어
#cloud = wordcloud.generate_from_frequencies(dict(tags)) #단어 100개

plt.figure(figsize=(10,8))
plt.axis('off')#x,y,축 숫자 제거
plt.imshow(cloud)
plt.show()
txt_path 에는 내보내기 한 카카오톡 파일이 있는 경로를 적어준다.
fonts_path에는 윈도우에 내장되어 있거나 네이버에서 무료 폰트를 다운받아서
사용하고자 하는 ttf파일의 경로를 적어준다.
words 를 사용하면 전체 단어 빈도수의 결과를 볼 수 있고
tags 를 사용하면 tags안에 적은 숫자 만큼의 단어 개수만 볼 수 있다.
728x90
반응형
